[Get to know Snac]
Snac is a decentralized control panel that manages your severs, users, domains and databases with just a few clicks. All the while security and upgrades are quietly working for you in the background... 24/7.
Our service gives you access to some of the best cloud providers in the world, while saving you valuable time and delivering a professional hosting environment.
Release Notes: Initial Beta Release: September 28, 2019.How to use Snac?
First step is to create a Snac account and select a Cloud provider, a couple examples would be DigitalOcean (DO setup tutorial) or Linode. Second, sign up with your selected provider and deploy a fresh Ubuntu 18.04 or 20.04 (64 bit) server (all Cloud providers provide easy to follow instructions). Once complete return to Snac and 'Connect your Server'.
Simple Hierarchy:
Servers: Administrator has global Shell SSH access.
Servers(Administrator) controls 'Users'.
Users: Have SFTP access.
Users control 'Domains' and 'Databases'.
[Connect Server]
Have your new server's root password and IP address ready.
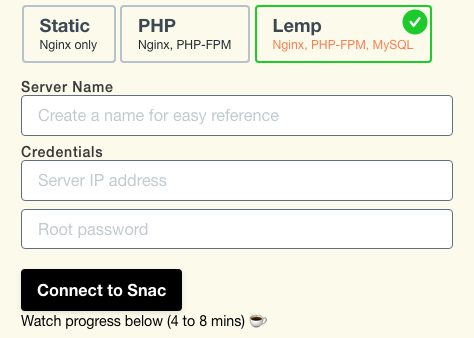
Next, login to Snac and click on the + button to expand connection fields.

Server stack options:
- Static (Nginx only):
Build a secure Static HTML site - PHP (Nginx, PHP-FPM):
Perfect for interactive Static sites or flat file CMS - LEMP (Nginx, PHP-FPM, MySQL): Designed for fluid or larger database driven projects. IE: Ecommerce, Laravel, OctoberCMS, Wordpress, Drupal...
After selecting your 'stack option' create a server name for easy identification, convenient if you have multiple servers (required).
Finally enter your server IP address and password.

Click 'Connect to Snac' and watch installation progress...
[Manage Users]
Each server must have at least one 'User'. Users are assigned global SFTP access to one or multiple domains within their scope. Users also control databases and are fully isolated.
From the server bar click on 'Users' icon

Click on the + button to expand form fields. Create a 'Username' and a strong password (Minimum 10 characters including one upper case and 1 number). This is your SFTP credentials so copy/save your new username and password somewhere safe 'before' clicking on 'Add User'.

You can reset SFTP credentials at anytime from the User bar eye icon...

[Manage Domains]
First, you need to purchase a domain name from a domain name registrar. Second, you need to set up DNS records for your domain by using either your Cloud provider's DNS hosting service or directly from your registrar. Also, be sure to create an A Record for 'www' to ensure both mydomain.com and www.mydomain.com are assigned a Security Certificate (Snac auto checks A Records for www.).
Third, update nameservers. Your registrar nameservers must be updated to point to your new server's nameservers instead. Typically, to change the nameservers, you’ll need to log into the domain registrar’s account, locate the DNS settings and update accordingly. DO tutorial (will work with any server)
To create a new domain, from your 'User' bar click on the globe icon...

Click on the + button to expand form fields. Enter your top level domain only ie: mydomain.com... click on 'Add Domain'

[Manage Subdomains]
Creating a sub-domain is the same process as creating a domain (use 'Add Domain' form), but instead of entering your TLD (top level domain), you enter the sub and domain together ie: 'sub.mydomain.com'
You must also create an A Record for your new subdomain in this case 'sub' in your server DNS settings. DO DNS Records tutorial (process will vary slightly with other providers, check individual docs)
[Manage Databases]
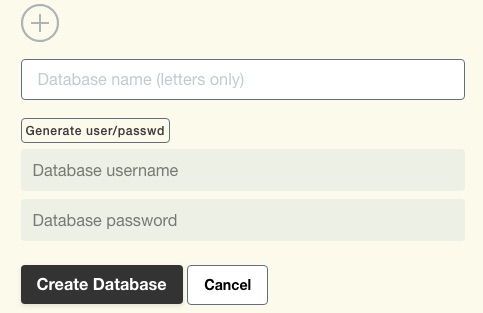
To create a new database, from your 'User' bar click on the square icon...

Click on the + button to expand form fields. Create a database name (letters only, underscore_ ok). Click on 'Generate user/passwd'. Copy/save your new username and password somewhere safe 'before' clicking on 'Create Database' (You will need user/passwd to connect your site(s) to this new database).

Database editor
We recommend Adminer, a light-weight alternative to phpMyAdmin... More info
[Manage SSL]
That's a Snac job, you don't need to do a thing. We scan our database every 10 minutes for new domains (DNS) pointing to its appropriate server. Once DNS matches the server, a new Let's Encrypt 'Security Certificate' is automatically installed. Snac also renews your 'Security Certificate' automatically every 3 months.
HTTP/2 support is automatically enabled by Snac when SSL becomes active.
That's it.
[Custom Nginx Server Block]
To setup custom domain configurations without potential Snac override create a (or several) *****.conf files in:
/etc/nginx/block.d/yourdomain-com/custom/
Keep in mind Nginx will load configuration files alphabetically. This is important when naming your custom files where order is important, such as the 'location directive.
Test and reload Nginx:
sudo nginx -t && sudo systemctl reload nginx
Resources
Work in progress
